Monday, December 27, 2010

Taiwanese Language


The Taiwan official language is Chinese. There is actually 3 different dialects of Chinese spoken in Taiwan. The main dialect used is Mandarin. It is estimated that 900 million people in the world (1/4 of the world population) speak a dialect of Chinese. Mandarin is spoken by at least half of the people in China as their mother tongue and is the official language of Taiwan and Mainland China.

Chinese is said to be one of the hardest languages to learn if not the hardest. Most of the sounds can be found in the English languages, but the biggest difference is the variation of tones. There are four different tones. The Chart below helps explain how the tones work:


You can pronounce the same sound, but depending on the pitch of your voice, can completely change the meaning of the word.  The picture below demonstrates the different meanings of words by the tone you use.


The written language is also very difficult. They do not use a alphabet like we do but symbols. Education Chinese people can recognize about 6,000-7,000 characters. To read a newspaper you need to know about 2,000-3,000 characters. There are over 40,000 characters, including obscure, variant, rare, and archaic characters, however less then a quarter of these are still commonly used today.


Monday, December 20, 2010

Sick Christmas


The 3rd annual Sick Christmas Party aka Dale Nolan Jr.'s Special Invite Chaos Christmas Party was a blast. You were required to were an ugly sweater and bring a gift for the gift exchange (which you sport for the day).

We had our gift exchange, which is demonstrated by the photo above.


Then we played Two Story Clue (invented by Rebecca and myself). The game took us about 2 hours to complete. There was double the weapons, double the rooms, and 7 players. (double the fun!).

After our game of clue ended, we baked some peanut butter chocolate cookies.

Taiwan Religion


Taiwan is a land of many different beliefs. They practice Buddhism, Taoism, Catholicism, Christianity, Mormonism, the Unification Church, Islam, and Hinduism, as well as native sects such as Yiguandao and others.


Taiwan has freedom of religion, they embrace their tradition while also welcoming new beliefs into their country.


Taiwan has a population of 23 million people


35% of that population puts their faith in Buddha


While 33% are Taoist, some even consider themselves both Taoist and Buddhist.


Many believe in a collection of beliefs engrained in Chinese culture termed "Chinese folk religion"


These beliefs include ancestor worship, belief in ghosts and spirits, among other things.


It is estimated that up to 80% of the population believe in some form of traditional folk religion.


There is a small percentage that consider themselves to be ProtestantRoman CatholicSunni MuslimChurch of Scientology, the Baha'i, the Jehovah's Witnesses, the Mahikari Religion, the Church of Jesus Christ of Latter Day Saints (Mormons) and the Unification Church , Presbyterians, the True Jesus ChurchBaptistsLutheransSeventh-day Adventists, and Episcopalians


From the list above that is only 475,000 people out of the entire population of Taiwan of 23 million, which means a even lower number of Evangelical Christians.


As I teach English I will not only be ministering to the country of Taiwan, but will also be training our students to better reach out to their own country.


Click Here to Give Support Online

(These are not my photos)

Friday, December 10, 2010

Winter Edit

I'm working on a winter video.

Field of Snowmen

We got some more snow fall, the sun was shinning bright, making the snow perfect for rolling snowmen. The first rolled together by myself within half an hour. Kurtis rolled his own also. Then we made one big one with the remaining snow left in our yard. The tallest snowman is probably about 8ft tall. This puts the snowman count to 4 so far.

Monday, December 6, 2010

Martin Fobes and Deezle Barn Sesh

Probably the two best skaters in Michigan, shredding the best home skatepark (at Martin's house).


Learning Chinese

Photo from Google
I have begun learning chinese beyond trying to studying it online. I am now being taught through skype from a former Word of Life Student, Iris. She lives in Hong Kong right now and is willing to take the time out of her week to teach me chinese every other day.

I also have gotten in contact with a friend of my cousin's who went to Taiwan as part of his ministry on the ship "Doulos". Betty is going to skype with me once a week.  Being able to hear someone speak Chinese and ask them conversation is going to really help me to learn pronunciation correctly and culture, giving me a head start for learning Chinese when I get to Taiwan.

I am very excited about learning a 2nd language over the course of the next 2 years, it is something I hope I will be able to use forever.

Friday, December 3, 2010

Thursday, December 2, 2010

Snow Alert!

The Government has issued a pollution of snow alert, warning families/children to stay out of the snow and immediate removal of the snow is a highly important. Please begin by rolling balls of snow for fasted removal. I have eliminated 33% of the snow in my house reducing the snow pollution down to only 77%. meaning that I have lowered the amount of snow on my street by 0.3%, in my neighborhood by .03% and in my city by about .003%. As you can see by the little I have down I am keeping the snow pollution. Do your part in removing snow and roll up some snowmen. And maybe we can bring out warm weather back...


Stay Alert for further updates about the snow dilemma!

Thursday, November 25, 2010

Monday, November 22, 2010

Vans - Yo Gabba Gabba

Vans has a few pretty sweet commercials promoting a new slip on design called Yo Gabba Gabba, I am not really sure what the graphic is all about or even if I am really down with it, I just like the commercials, its something that I would enjoy doing. And I love their shoes, just not these ones...


Friday, November 19, 2010

QR Codes


If you haven't heard of QR codes yet it's time to learn about them. The image above can be scanned by your smartphone (iPhone, etc.). When it is scanned it will automatically bring you to my website, for this instance this QR code will bring you to my blog. But no need for that because you are already here. 

However lets say I have a art show or a skate demo coming up and I want to promote it. I can put our fliers promoting the event, and then also have this QR code on the flier. People can then scan the code and it will bring up all the information they need to know about the event. There is many uses and reasons you would want to use this.

I can put this on all the photos I post online and if anyone is interest in my work they can scan it and it will bring them right to my website, making it easier to contact me.

QR codes are getting more and more common, especially as smartphones become more and more common. If you are interested in making one, it is a lot easier then you think. It won't cost you any money. All you need to do is follow this link and then proceed to enter in your web address. Then it will automatically generate your own QR code.

Wednesday, November 17, 2010

Wedding and Jersey Video

It is finally done, I have finished the video documentary of my trip to the wedding and my week in Jersey working with SFNJ skateboard ministry.

I am sorry I have not been posting on my blog. My external hard drive crashed so I have no where to store all my GB's of photos/videos. This set me back a ton with the photos and video I had on my camera waiting to go onto my computer. I finally just went out and bought Memorex DVD+R 16x 4.7GB 25 Pack Spindle. I figured even after I get my hard drive back, I want to store my photos in two places this time instead of one, just in case it crashes again. I hope you enjoy the video.

Part 1


Part 2

Tuesday, November 16, 2010

Veterans Day Skate Session

I drove to Walmart to do a little skateboarding and ran into a couple of dudes, D.J. Bishop and Travis Fleser. We shredded the mani-pads at Walmart for a few hours then they showed me a sick little gap behind by KFC.

Thursday, November 11, 2010

First Hand Jamie Thomas

My favorite skater of all time and most influential in my skateboarding Jamie Thomas in Fuel TV's Firsthand.

Tuesday, November 9, 2010

How to make Skateboard Sequences with Photoshop


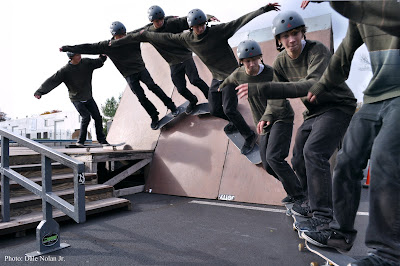
Rohs Heck - Wall Ride          Photo: Dale Nolan Jr.

Please click the link to watch my tutorial on YouTube. https://youtu.be/7fUeU7XK0EY
Please follow the link to my newer and easier way to make sequences in photoshop


I took this photo when I was down in New Jersey working with SFNJ for the week. The skater in the photo is Rohs Heck. From previous post, I noticed some traffic to my blog, from people trying to figure out how to do skateboard sequences. And so that is just what I am going to do, try to help you understand/learn how to do it.

The first and most important thing is your equipment. If you are using a more low end camera, you won't be able to shoot as many photos per second. Most low end cameras only shoot about 3 frames per second. Which will leave you with not a very cool sequence and most likely will have the skater before his trick and when he hits the ground, completely missing the trick.

I use a Nikon D5000, it takes about 7-9 fps (frames per second). In you camera settings there should be an option to have a single shot, or "Continuas Shooting".  You want continuas shooting On.  For shooting skateboarding photos I prefer to just use the standard 18-55mm VR Lens that comes with the camera.

The second most important piece of equipment is editing software. The better your software the easier this process will be. I use Adobe Photoshop CS5. It is possible to do this with other editing software but good results won't be as easy to come by. Better software doesn't guarantee good results. The more practice and patients you have when working with your photos will effect the overall result.

The first thing you need to do when shooting a skateboard sequence is to go out and take the pictures.

Once you figure out a good angle there is a few things to keep in mind.

1. Will I be able to get the whole skateboarder's body in the shot? If not find a new location, or take a few steps back. I generally try to be able to see the run up and the landing. If you cannot not see both the run up and the landing, it is better to have the landing in view.

2. Check you camera settings. Do you have Continuas Shooting Mode On? Is your shutter speed fast enough to prevent motion blur? I normally like to have my shutter speed set to around 1/250 of a second or higher. In the particular photo above it was set at 1/320 of a second with my aperture at 6.3 and a low ISO of 100.

3. Take some Test Shots. Before someone starts rolling up to do a trick. Take a few photos to make sure everything is right. Make sure your pictures aren't over or under exposed, white balance is set right, your angle is good, nothing is getting in the way of the shot, etc. Just examine your settings.

4. Set your Focus. One of the most important things is to make sure your focus is right. Many times you will have a great shot, but you focus is off just enough to ruin the entire photo. You can use auto-focus but I prefer to manually do everything. To help figure out if your focus is right, have your friend stand where he will be performing the trick, then focus it to him. You can also focus accordingly by using the objects at the point you want the photo taken. For the picture above I focus my camera to the middle section of the wall he was riding on.

5. When Shooting depending on the type of sequence you are taking you generally don't want to move your camera. Make sure you have VR turn on if you have a Nikon camera to help reduce shake. It is ok to have a little movement, because photoshop can help you correct that. Even if the skater moves by you, try to keep the camera in the same position the whole time. It might help you don't actually look at the moving skater but focus on the object he is skating.

6. Start taking the photos before the skater comes into the frame and continue taking a few photos after he leaves the frame. This will give you more room to play with and will help prevent missing any good pictures you would have needed.

After taking the photos review on your lcd screen what you have captured, just in case you need to reshoot it.

The Editing Process:

Once you get you photo's onto you computer using the Adobe Bridge view your photos. Select the entire row of pictures you want to put into a sequence by clicking on the first image then hold shift clicking on the last image. Go up to the tools menu, then click on photoshop which will give you a list of options. Choose photomerge... from there. This will bring you to another window that allows you to do Panorama type stuff. I normally prefer the "Collage" option, but you might want to play around. I do this because photoshop will help line up my photos for me, so I do not have to do that myself.

Once it creates your photo merge. I normally reorganize my photos, by brining the top image to the bottom of the layers and so forth until I have the bottom image at the top. Unless you shot the photos from behind the skater with him skating away from you. Then don't do this.

Photoshop has created these masks next to each of your photos. I go down the list clicking on the mask selecting the pushing "Command+Delete" on my keyboard or "Control+Delete" for Windows. This should make the mask Completely White. If not then push the "x" key to change you brush colors around, then do what I told you above.

Then begin with your top photo by brushing Black into your mask. If you have the photo selected you will actually be painting on the photo. Make sure the mask is selected. When you paint black it hides the layer context revealing the layer beneath it. Mask everything away until you have only the shape of a skateboarder in white in your mask selection. Don't worry about to much touching up yet. You can do that further down the line. Continue to do this to all of your photos. Then go back to your first photo.

The brush has a slight feather that might give you skater a little bit of transparency if you got to close to him, that is ok. If that is the case push the "x" key to switch your brush back to white to paint your skater back into place. You might paint away the other skater behind him as you get closer to the skater in the mask you are working on zoom in and make the brush smaller and smaller. Continue to do this as you go down your layer of photos. The smaller and closer you make your brush the less you will have that funny glow in between the images.

Pretty much after this it all depends on your patients and playing around with the photo masks. Use different aspects from the different photos to paint your scenery back into place. Sometimes it is easier to have a standard background image of the object that didn't have a skater in it when you shot the photos to help create the scenery easier. Normally using the lowest layer on you layer chart is the best to use for the scenery.

After you get this all together, you probably have noticed you need to crop your image. It is pretty easy just use the cropping tool and select what you want to see in your final image.

Once your done with the sequence part of things, have some fun with your photo. Get creative to make it look even better. Maybe change the color or add something unique. Here is my final edit.


If there seems to be any confusion please post a comment so I can clarify.

Tuesday, November 2, 2010

Editing Trip Video

I am working on editing my 2 week trip together into a mini-documentary. It is taking longer then I wanted it too because I don't have my external hard drive and my computer can only handle so much video footage.

Brian Cordes Art/Printing


My friend from New Jersey, Brian Cordes does silk screening among other printing. He is also an amazing artist and a fun dude to skate with. Check out his artwork and printing at http://briancordes.com/ 

If you want some sweet art in your ads or whatever else you need it for, go to this guy to get the job done. They do high quality printing that most printers can't do.

Wednesday, October 27, 2010

Owen and Jessica's Wedding Photos

Here are some photos from the wedding. I did not take all of them because I am in the wedding party, but I did make all the adjustments.

Photo Taken by Andrew Nippert     In photo: Dale Nolan Jr., Will Gallison
Photo Taken by Andrew Nippert   In Photo: Me, Daniel S.,Brent W., Will G.,  Kyle Paradis

Below is the original photo before any adjustments. It was quite sad to have this ugly vehicle in the photo. So I managed to remove it. It isn't too noticeable in the "final" copy of the photo above, without me pointing it out. Though these aren't the final edits. Some of the photos you will see require more work, but I wanted to get some stuff posted up for you too see. I am somewhat busy currently in New Jersey. This photo is to illustrate us guys waiting for Owen as if he was taking to long to get ready.

Jessica and Owen Walsh              Original Photo by Paul Mackey
Below is the original of the photo above I really like the picture above, of their first kiss as a married couple. But it required a lot of adjustments to to achieve the final results. What I love most about this photo is the pastor in the background...

A tricky part of the edit was getting hat leaf thing removed without removing her vail, but it worked out.


Photo: Dale Nolan Jr.
Taken by Dale Nolan Jr.


Sunday, October 24, 2010

A Brief Peek into the Trip

Here is a few photos to peek your curiosity to what I have been up too. I will be putting up another blog post with more detail of what all went down.


Thursday, October 21, 2010

Gone for the Week


This morning I flew from Grand Rapids at 4:02am to Ohio to Hartford, CT, arriving at 9:00am. The main reason was to go to my friend Owen and Jess's wedding. However seeing I was in the area, why not make a quick stop at New Jersey working with the skate ministry "Solid Foundation" I will be flying home Sunday afternoon on Halloween.

I will probably be posting up a few updates about my trip while I am gone.

Monday, October 18, 2010

Rabid Raccoon

Isn't he cute?
My Dad and I were doing some yard work, ranking leaves, etc. When we were about half way done, a huge raccoon started to walk right up to us. He had no fear. I ran inside to grab my camera, while my Mom was yelling at my Dad to get inside.

Maybe not so cute...
He keep pacing in circles and stumbling around as if he was drunk. 


My Mom called the police to find out how to remove him. They gave us the number to the some animal place. However apparently they will not come out to remove a rabid animal in a highly infested children neighborhood. They told us to discharge it ourselves.


Monday, October 11, 2010

HDR Leaf

High Dynamic Range or HDR for short is a term used a lot in photography. Perhaps an overused technique but can be used to make beautiful photography. The human eye has an extraordinary HDR, something that can't be seen by electronic devices. However by using this technique with your camera you can achieve the dynamic range similar to that of a human eyes range.

 Though this technique is used for that purpose, it is also used to exaggerate. HDR allows for a greater dynamic range of luminance between the dark and light areas of a photograph. By taking at least 3 of the same photos at different exposures (by bracketing) then going into photoshop (or other programs) and layering the images together.

If you think you need a tripod for this technique you are wrong. The photo's below where done without a tripod.
(if you look closely at the leaf in the left corner of all 3 pictures you can see that I didn't hold the camera perfectly still)

By tone mapping these 3 images together:

Normal Exposure
-1 stop exposure
+1 stop exposure

Final HDR Image

Saturday, October 9, 2010

Panorama

This is my first time doing a Panorama. I actually took the photos for it, before I even knew how to make one properly. I pre-took the photos with the intention to learn how to do it, within the week.

Click on the image for a larger view
Thankfully I didn't have to stitch these photos together by my own hand. Photoshop does a great job in stitching the photos together, and reducing distortion. I wish I knew how to do this and other things, when I was living in the Adirondack Mountains of New York.