Showing posts with label photoshop. Show all posts

Wednesday, August 6, 2014

Photo Re-edit from 2010

Left: Re-edit                                                       Right: First edit in 2010

I've recently been looking through old photos, for memories and as part of a project to put together a website. I decided to try to re-edit some old photos that I originally edited terribly. The problem with this is I only have a single jpg file and destroyed the original photo in the process of doing the first edit. One of the many mistakes I made when I was first learning photography. Not long after this photo I started shooting only in RAW and started saving the original files un-touched.

This photo was one of the easier ones to do a re-edit on because it was mostly color that was off. Which photoshop can make up new colors and put color in that didn't exist. However a lot of my other photos I did stupid fake blurs and such which can't be undone. I believe the original edit was done in iPhoto (on the right). I wish I could just go back and re-due the whole photo though the only thing I did do right with this was the way I composed it.

Friday, March 23, 2012

Photoshop CS6 Beta

I am excited to inform you that you can now download the beta for Photoshop CS6. Don't have to spend a dime or wait for it to be released check out the software for free. It's taking me about 8 hours to download though, but its worth the wait. Get it Here. The beta will expire May 31st though.

Tuesday, August 30, 2011

How to make Skateboard Sequences with Photoshop


Please click the link to watch my tutorial on YouTube. https://youtu.be/7fUeU7XK0EY

I have posted a earlier tutorial on how to make skateboard sequences, but decided to redo it because I have learned even easier and more effective ways of editing a skateboard sequence using photoshop since then. If you want to learn more about Camera specs and set up please read my other post (or just send me a message). This one is only going to focus on editing in Photoshop CS5.

Begin by selecting all your photos in the sequence that you want to use. 
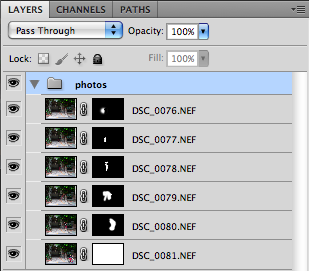
With the photos selected go up to your Tools menu and scroll down to Photoshop. Then select the option Load Files into Photoshop Layers... This will load all your files automatically into one photoshop document.
Then with all your layers selected go up to the Edit menu, selecting Auto-Align Layers... This will automatically align the photos in the sequence for you. So you don't have to manually rotate the images trying to get for example the grind rail to line up perfectly while also having the stairs match up.
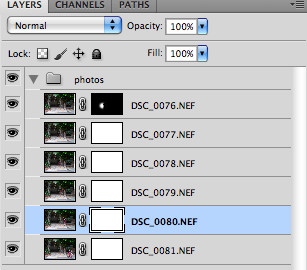
For organization select all your photos and press Command G to put all your photos in a group just to keep things from getting mixed with other layers you will create.
It is good to begin with your top photo or the photo with the skater behind the other images of himself. Begin by selecting the Layer Mask and press Command + Delete. This should fill the layer mask with black, making the image not visible. (If it doesn't press "x" and try again.) Then begin masking only the skater into the image using the brush tool making the white section on the layer mask the part that is the skater.
After painting in  the back skater work on unpainting the other skaters back in that you might have blocked out from painting too much white into your layer mask.
Eventually if you take your time and zoom in (paying attention to the little things) you will have a smooth transition between each skater. Continue to repeat this process until you have the whole sequence finished.

After you get the sequence finished you are all set to do any other edits you feel necessary! Good Luck! 

Monday, June 6, 2011

Shooting in RAW

There are many reasons to shoot in RAW format and there are also a few not too.

Reasons not to Shoot in RAW
The main reason why people don't shoot in RAW is because the files are bigger, taking up more room on you SD card and also your computer's harddrive. Another reason is that jpeg is compatible with more software, you can't just upload a file in RAW to facebook or where ever else you want it to go, most of the time it needs to be in jpeg format. So when shooting in RAW all the files you want to use you need to convert to jpeg. Also while taking photos each photo takes a little longer to capture seeing as you are capturing it in a bigger format.

1. Big Files
2. Long process of converting files
3. RAW captures images slower

Reason to Shoot in RAW
1. Camera doesn't Edit
When shooting in RAW your images will look really flat. When you shoot in jpeg lots of cameras will automatically enhance the image. Because you get the image with no editing being done to it, it leaves more options for you in the editing process.

2. Dynamic Range is one of the main reasons I shoot in RAW. In jpeg you only get a few stops, but a RAW file will have all the data from the image sensor which will give you a range of about 8 stops. So if you have an image that is over-exposed you might beable to recover some of that data. However if you shot the image in jpeg you will not be able to make as much of a recovery. Let me give you an example.


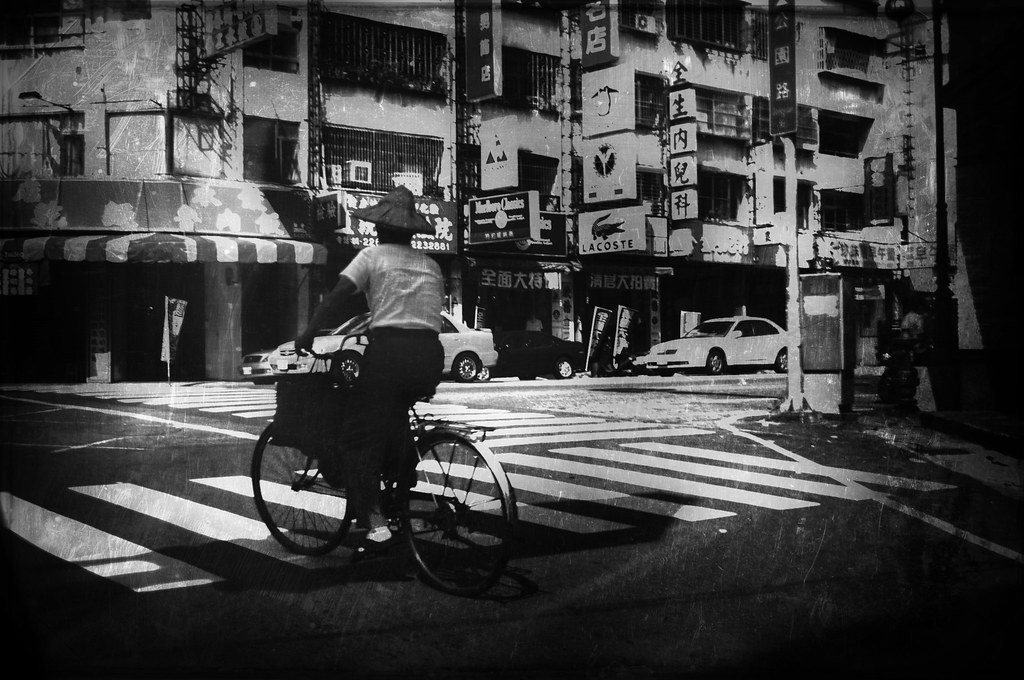
I shot this photo in Taichung, Taiwan from the back window of the taxi. The night before I was shooting night scenes which had my settings on my camera all screwy. So I tried to quickly make the adjustments to take a picture of this man riding his bike. However it is obvious that the image above is way to overexposed. If I shot in jpeg this image would be completely garbage.

When opening a RAW image in photoshop from Bridge it will automatically open it into Camera RAW. The RED is showing me the parts of the image that is way way to overexposed. Basically it is telling me that there is no detail there.
If you cannot see any RED on your image Click on the right triangle above your histogram. If you click on the left triangle it will show parts of your image there are to dark or black using the color BLUE.
Here is the settings you will mostly use in Camera RAW. Recovery will darken or brighten your highlights aka it will remove the RED parts of your photo. Fill Light will brighten or darken your shadows aka it will remove the BLUE parts of your photo.
As I adjust my exposure and lighten my highlights by using Recovery. I begin to restore my image. Though an image that was as overexposed as mine is very hard to make a good recovery but for photos that aren't so badly overexposed it is a great way to fix them.


Below is my final result, after I cleaned up all the parts that were overexposed the best I could I added some contrast in photoshop, made it Black and White, and tried to give it a look as if it was a photo taken a long time ago.


Tuesday, November 9, 2010

How to make Skateboard Sequences with Photoshop


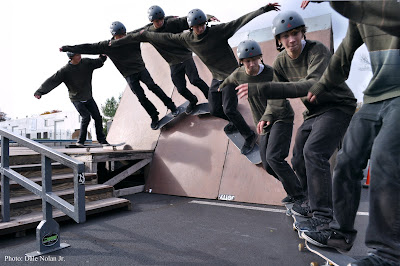
Rohs Heck - Wall Ride          Photo: Dale Nolan Jr.

Please click the link to watch my tutorial on YouTube. https://youtu.be/7fUeU7XK0EY
Please follow the link to my newer and easier way to make sequences in photoshop


I took this photo when I was down in New Jersey working with SFNJ for the week. The skater in the photo is Rohs Heck. From previous post, I noticed some traffic to my blog, from people trying to figure out how to do skateboard sequences. And so that is just what I am going to do, try to help you understand/learn how to do it.

The first and most important thing is your equipment. If you are using a more low end camera, you won't be able to shoot as many photos per second. Most low end cameras only shoot about 3 frames per second. Which will leave you with not a very cool sequence and most likely will have the skater before his trick and when he hits the ground, completely missing the trick.

I use a Nikon D5000, it takes about 7-9 fps (frames per second). In you camera settings there should be an option to have a single shot, or "Continuas Shooting".  You want continuas shooting On.  For shooting skateboarding photos I prefer to just use the standard 18-55mm VR Lens that comes with the camera.

The second most important piece of equipment is editing software. The better your software the easier this process will be. I use Adobe Photoshop CS5. It is possible to do this with other editing software but good results won't be as easy to come by. Better software doesn't guarantee good results. The more practice and patients you have when working with your photos will effect the overall result.

The first thing you need to do when shooting a skateboard sequence is to go out and take the pictures.

Once you figure out a good angle there is a few things to keep in mind.

1. Will I be able to get the whole skateboarder's body in the shot? If not find a new location, or take a few steps back. I generally try to be able to see the run up and the landing. If you cannot not see both the run up and the landing, it is better to have the landing in view.

2. Check you camera settings. Do you have Continuas Shooting Mode On? Is your shutter speed fast enough to prevent motion blur? I normally like to have my shutter speed set to around 1/250 of a second or higher. In the particular photo above it was set at 1/320 of a second with my aperture at 6.3 and a low ISO of 100.

3. Take some Test Shots. Before someone starts rolling up to do a trick. Take a few photos to make sure everything is right. Make sure your pictures aren't over or under exposed, white balance is set right, your angle is good, nothing is getting in the way of the shot, etc. Just examine your settings.

4. Set your Focus. One of the most important things is to make sure your focus is right. Many times you will have a great shot, but you focus is off just enough to ruin the entire photo. You can use auto-focus but I prefer to manually do everything. To help figure out if your focus is right, have your friend stand where he will be performing the trick, then focus it to him. You can also focus accordingly by using the objects at the point you want the photo taken. For the picture above I focus my camera to the middle section of the wall he was riding on.

5. When Shooting depending on the type of sequence you are taking you generally don't want to move your camera. Make sure you have VR turn on if you have a Nikon camera to help reduce shake. It is ok to have a little movement, because photoshop can help you correct that. Even if the skater moves by you, try to keep the camera in the same position the whole time. It might help you don't actually look at the moving skater but focus on the object he is skating.

6. Start taking the photos before the skater comes into the frame and continue taking a few photos after he leaves the frame. This will give you more room to play with and will help prevent missing any good pictures you would have needed.

After taking the photos review on your lcd screen what you have captured, just in case you need to reshoot it.

The Editing Process:

Once you get you photo's onto you computer using the Adobe Bridge view your photos. Select the entire row of pictures you want to put into a sequence by clicking on the first image then hold shift clicking on the last image. Go up to the tools menu, then click on photoshop which will give you a list of options. Choose photomerge... from there. This will bring you to another window that allows you to do Panorama type stuff. I normally prefer the "Collage" option, but you might want to play around. I do this because photoshop will help line up my photos for me, so I do not have to do that myself.

Once it creates your photo merge. I normally reorganize my photos, by brining the top image to the bottom of the layers and so forth until I have the bottom image at the top. Unless you shot the photos from behind the skater with him skating away from you. Then don't do this.

Photoshop has created these masks next to each of your photos. I go down the list clicking on the mask selecting the pushing "Command+Delete" on my keyboard or "Control+Delete" for Windows. This should make the mask Completely White. If not then push the "x" key to change you brush colors around, then do what I told you above.

Then begin with your top photo by brushing Black into your mask. If you have the photo selected you will actually be painting on the photo. Make sure the mask is selected. When you paint black it hides the layer context revealing the layer beneath it. Mask everything away until you have only the shape of a skateboarder in white in your mask selection. Don't worry about to much touching up yet. You can do that further down the line. Continue to do this to all of your photos. Then go back to your first photo.

The brush has a slight feather that might give you skater a little bit of transparency if you got to close to him, that is ok. If that is the case push the "x" key to switch your brush back to white to paint your skater back into place. You might paint away the other skater behind him as you get closer to the skater in the mask you are working on zoom in and make the brush smaller and smaller. Continue to do this as you go down your layer of photos. The smaller and closer you make your brush the less you will have that funny glow in between the images.

Pretty much after this it all depends on your patients and playing around with the photo masks. Use different aspects from the different photos to paint your scenery back into place. Sometimes it is easier to have a standard background image of the object that didn't have a skater in it when you shot the photos to help create the scenery easier. Normally using the lowest layer on you layer chart is the best to use for the scenery.

After you get this all together, you probably have noticed you need to crop your image. It is pretty easy just use the cropping tool and select what you want to see in your final image.

Once your done with the sequence part of things, have some fun with your photo. Get creative to make it look even better. Maybe change the color or add something unique. Here is my final edit.


If there seems to be any confusion please post a comment so I can clarify.

Wednesday, October 27, 2010

Owen and Jessica's Wedding Photos

Here are some photos from the wedding. I did not take all of them because I am in the wedding party, but I did make all the adjustments.

Photo Taken by Andrew Nippert     In photo: Dale Nolan Jr., Will Gallison
Photo Taken by Andrew Nippert   In Photo: Me, Daniel S.,Brent W., Will G.,  Kyle Paradis

Below is the original photo before any adjustments. It was quite sad to have this ugly vehicle in the photo. So I managed to remove it. It isn't too noticeable in the "final" copy of the photo above, without me pointing it out. Though these aren't the final edits. Some of the photos you will see require more work, but I wanted to get some stuff posted up for you too see. I am somewhat busy currently in New Jersey. This photo is to illustrate us guys waiting for Owen as if he was taking to long to get ready.

Jessica and Owen Walsh              Original Photo by Paul Mackey
Below is the original of the photo above I really like the picture above, of their first kiss as a married couple. But it required a lot of adjustments to to achieve the final results. What I love most about this photo is the pastor in the background...

A tricky part of the edit was getting hat leaf thing removed without removing her vail, but it worked out.


Photo: Dale Nolan Jr.
Taken by Dale Nolan Jr.


Monday, October 11, 2010

HDR Leaf

High Dynamic Range or HDR for short is a term used a lot in photography. Perhaps an overused technique but can be used to make beautiful photography. The human eye has an extraordinary HDR, something that can't be seen by electronic devices. However by using this technique with your camera you can achieve the dynamic range similar to that of a human eyes range.

 Though this technique is used for that purpose, it is also used to exaggerate. HDR allows for a greater dynamic range of luminance between the dark and light areas of a photograph. By taking at least 3 of the same photos at different exposures (by bracketing) then going into photoshop (or other programs) and layering the images together.

If you think you need a tripod for this technique you are wrong. The photo's below where done without a tripod.
(if you look closely at the leaf in the left corner of all 3 pictures you can see that I didn't hold the camera perfectly still)

By tone mapping these 3 images together:

Normal Exposure
-1 stop exposure
+1 stop exposure

Final HDR Image

Saturday, October 9, 2010

Panorama

This is my first time doing a Panorama. I actually took the photos for it, before I even knew how to make one properly. I pre-took the photos with the intention to learn how to do it, within the week.

Click on the image for a larger view
Thankfully I didn't have to stitch these photos together by my own hand. Photoshop does a great job in stitching the photos together, and reducing distortion. I wish I knew how to do this and other things, when I was living in the Adirondack Mountains of New York.

Tuesday, October 5, 2010

Saturday, October 2, 2010

Photoshop: Skateboard Sequences

Photos Taken by Kenny Hopkins

I wanted to try to put together a few different skateboard sequences in photoshop, seeing as I have never done it before. I tried to imagine as if I was going to put it into a skateboard mag as an ad or something. However seeing I am not riding for any company and that I will be going to SFNJ (skate ministry) in October. I figured I would make an imaginary Promo, as if I was important or something. haha.

Photos by Kenny Hopkins
Photo by Dale Nolan Jr.


Click on the Images to enlarge them.

If you are looking for a way to make skateboard Sequences click here.

Friday, September 24, 2010

Photoshop: Before and After (Apple Orchard)

The photos below are to show the alterations I made in photoshop. The first photos are completely un-altered files. The second photo displayed is what it looks like after the altercations were made. (for better viewing click on the photo to enlarge it).

Before

After

I actually didn't make to many changes to this photo. I brightened the image up, making greens more green and reds more red, with very minor changes to the actual apples.

Before
After

In this group I did a lot more. The most obvious thing I did was brightened up the photo a little bit. Then I made the greens more green, and the reds more red. If you look at the first photo you can see some rotten apples and a couple on the tree branch with bruises, I took out the bruises and made them ready to eat apples. A lesser noticeable change I made was adding grass. There is more grass and less brown patches in the 2nd photo.

Before
After
This set I made the reds very rich. You might notice a few bruises that I changed. I also added a lot of greens. To give the photo more color contrast with the red apples up against the green grass (clovers), instead of the dirt.

Before

After
Before
After

This was a little more difficult process, for this photo. I brightened it, gave it more contrast. However all the work was trying to get the apples to work out right. I fixed up the apple the dog was chewing on. But when I adjusted the color for the dogs apple the other apples became a very fake red. So I have to create two images with separate altercations. The dog on the right is actually a whole in the duplicate photo. You are looking at a photo behind a photo. I had to do this, so I could apply specific things to the bottom image, and then the other altercations was just applied to both images, which was just fine. I am still trying to learn the best way to do things. 

It's easy messing with my photos doing simple color/brightness changes, but once I get into doing all this editing it gets more difficult. It's almost easy to just use iphoto to change the photos colors, etc. However I want to learn how to use photoshop better, because then in the long run, I can do a lot more.

I actually prefer my photos as natural as possible, however photoshop is used for many different things, and I need to use my photos to learn how to do all that other crazy stuff.